Happy Fall!! This is my FAVORITE time of year. I get so excited for coats, layers, Hot Chocolate, pumpkin shakes, just everything. We just got our family pictures taken, and they turned out so great. I can't wait to share some more here. For the pictures I wanted my little girl to be wearing a peacoat. It is chilly out, but I wanted something super adorable for her to wear that would be warm. I looked at some online and they were more than I wanted to spend. So I set out to make one. I had an old dress I was getting rid of, and the fabric was just what I was thinking in my head, so I re purposed it. Here is how it turned out:
Wanna make one? I'll show you how below:
So to preface this, I don't think this is a beginners sewing project. I took some pictures along the way, but most of the stuff, you kinda have to know how to do and I will just describe it. There are not too many seams, but this is not a super easy sewing project.
Ok!! Here we go!!
Materials:
- Fabric for outside of coat ( I used an old dress )
- Fabric for lining Inside of coat ( my dress had a lining)
- A piece of clothing that fits your baby to trace for pattern
- Thread in color choice
- 8 buttons
- scissors
- tissue paper and pen/ pencil ( for making pattern)
Steps:
1.) I Started out with an old dress I was getting rid of. The fabric is nice and warm, and resembles wool. The dress also came with a liner, which was perfect because I just used this for the lining in the coat. I was also able to reuse the buttons off of it for the front of the coat. I had to buy 4 more buttons similar just smaller. They cost me 5 cents each. ( I have a great local fabric shop.) So total cost for me was 20 cents. I know I bought the dress at least 6 years ago. I got it at goodwill. So it is a sunk cost, not gonna count it, but prolly like only 6 dollars to start anyways. :)
I started by un-picking the seams in the back of the dress by the zipper, so that I could lay it out flat and use like a large piece of fabric.
2.) I made a pattern:
there might be a better way but this is how I did it:
I used this little cotton jacket that I had, and liked the design of it. I laid it under my tissue paper, and carefully felt for the seams, and drew on top of the paper where those seams where. I made sure to stretch the jacket free of any wrinkles or lumps to make sure that I got the sizing right.
If you do not have a similar thing that you would like to trace, use other items. A bodice of a shirt and sleeves from a long sleeved shirt would work well too.
You just might have to make it slightly bigger and flared at the bottom to make sure that it will fit. I made the first mistake of not thinking about the fabric types. If what you are tracing is stretchy make sure that you give your non-stretch fabric a little more room so that it will fit around your babe:)
I made sure to label which parts I had traced so that I didn't get confused later. Above is the back of the jacket. There are no seams in it, and it is one big piece.
I added a seam allowance of about "5/8 to all of the sides. ( I started to draw it out all measured, then just ended up eye-balling it.)
I made a pattern for each of these pieces:
Back of coat, front flap ( bottom half), front flap( top half), sleeve, collar, sleeve embellishment ( cuff) , and back of coat embellishment, ( which is the same as the "cuff" piece.)
 |
sleeve, collar, and cuffs. The back embellishment also uses the cuff. Since the coat I was tracing from didn't have these, I just drew a rectangle and added seam allowances.
Also make sure the sleeve has enough shoulder room. The curved part is where the shoulder will be. |
 |
Front flaps. As you can see, the first line on the bottom is the length of what I was tracing off of the brown jacket. I wanted it to be longer, so I just added a few inches length and a seam allowance of 1".
Make sure that the top and bottom pieces put together form a semi- circle for an arm opening. |
 |
| all of the pieces together |
3.) I cut out the pattern pieces and pinned them to my fabric. Then I cut them out. Below is the back of the coat being pinned and cut.
 |
| I didn't follow the bottom of the pattern exactly because I decided I wanted to use the hem from the dress, so that I didn't have to sew my own. So I left the bottom un-cut. |
I cut the following pieces:
Back of coat (2)- 1 plaid, 1 lining material .(Can be cut on fold as well if pattern is folded in half.)
Front flap bottom (4)- two plaid, one for left side on for right, and then 2 lining , one for each side.
Front flap top(4)- two plaid, one for right and one for left, Two lining, one for each side
Collar (2)- plaid material one for inside and one for outside
Sleeves ( 8) - four plaid. fronts and backs, 4 linings fronts and backs.
Cuffs (6)- all plaid a front and back for each arm, and then a front and back for back embellishment
4.) I sewed the Front flap top and bottom pieces together facing the right side of the fabric together, leaving the seam inside. I just used a regular stitch, and then zig- zagged along frayed edges. If you have a serger use that... Don't have one....someday....:)
5.) I continued putting the pieces together using a "5/8 seam allowance, piece by piece. I sewed the front flaps on to back piece next. When these were all put together it looked like a vest. You can see where the arm holes are above.
I then sewed the sleeves together. I took two pieces put the right sides of the fabric together, and sewed and zig zagged.
Then I sewed the sleeves into the armholes, so that the seams are on the insides. this gets a little tricky. I found it easiest to turn the jacket ( vest) inside out, and then put the sleeve into the hole from the inside leaving the sleeve turned right side out. This puts the seams in a way that will make the seam on the inside.
6.) I continued on with this doing the exact same thing with the lining fabric so that I had two coats. One with plaid, and one with lining. I made sure the finish the hem on bottom of both where needed after sewing the pieces together. I tried to cut most of the bottom pieces on the hem of the dress so that I didn't have to do this though.
After I had two coats, one plaid and one lining, I turned the lining one inside out. I then stuck it inside the other coat. I did this so that the lining seams would be facing the inside. This way no raw seams are visible.
7.)To sew the lining into the sleeves, just flip the sleeve inside out, and stitch around wrist. Including both the plaid and lining. Then flip right side out.
Here is what mine looked like with all of the pieces sewn together and the sleeves attached to the lining:

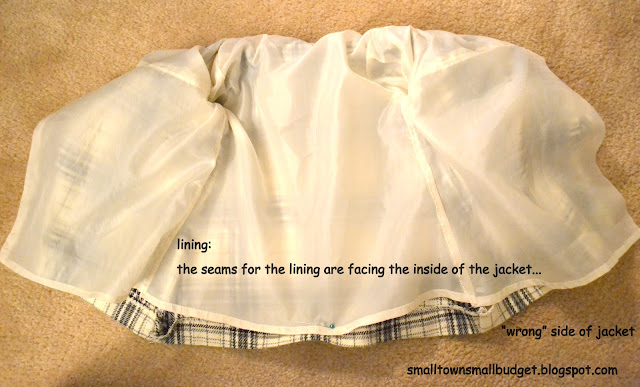 |
above shows the inside or wrong side of the jacket, and the lining. it is still loose and is only attached at inside of sleeves.
8.) I then sewed the collar. I put the right sides of the fabric together, and sewed along 3 sides. I left the bottom side open because it would be in the neck seam anyways. I then flipped it right side out, and top stitched around the edges for decoration.
I did the same thing for the arm cuffs, and the back decoration. I sewed the fabric right sides together, and left one side un- stitched. I then flipped them right side out. At this point they look like pillow cases. I tucked in the seams, and then top stitched around the edges of all 4 sides.
In retrospect I should have included the cuff into the sleeve seams when I was sewing the sleeve. Well I didn't So I had to turn it inside out, and un- stitched a place for the cuff. I placed the entire little rectangle inside the turned out sleeve and stitched over the end. When I turned the sleeve right side out it was now in the seam. Just one side though. It should be like a flap. I attached the other side with the button.
9.) Putting in the collar. I flipped the jacket up side down to that I was looking inside the lining, and wrong side of the jacket. I flipped it so that these to raw seams were facing each other right sides of the fabric together. I then pinned along the neck seam right sides together. I added the collar into the seam. I put the raw edge that I had not sewn into the neck seam. I then sewed across the entire neck seam catching the collar inside it. I made sure to leave my needle in and pivot at the end of the top neck seam where it would be the "flap part" on the front of the jacket, and square it off. Then flip it right side out, and your collar will be in the seam, and the top edge of the coat is no longer raw.
10.) Finishing touches:
Lastly is the finishing touches. I folded over the flaps in front towards the inside lining about 3/4" as a seam allowance. I stitched it in place along in the inside of the seam. I top stitched in a rectangle on the outside of the jacket. This creates a little place of the button holes later.
I left the lining open at the bottom of the jacket. It is only attached at the sleeves, and neck seams.
I hand sewed on buttons onto the cuffs, making sure to not go through the lining on the inside of the coat. I used the button to hold down the cuff flap opposite of where it is insert in the seam:

|
I did the same thing with the back of the jacket adding on the embellishment. The buttons are holding it on on either side. I again made sure not to catching the lining in this.
Then I used my button hole foot, and sewed two button holes on top of the flap/ hem I created on the front of the left jacket front. Then I sewed on two buttons for going through the holes, and two faux buttons for looks.
 |
| All Done!!!!! |
It was an ambitious project but it only took me a day, once I got the pattern made. Hope you have a happy day!!
-Amanda


